
ref 2

articles/Fashion/hollywood-page2
by Tom Lee Published 01/12/2010

So what else goes into making a good Hollywood style portrait? When looking at many of Hurrell's images, particularly in his early work, you will notice that eye contact and smiling is not a prerequisite. The object was to make women look more sophisticated or provocative, the men powerful and dramatic. This was often achieved by making them appear more aloof with the shooting position below the sitter's eye line or from well above the top of the sitter's head. Lighting positions were generally high to replicate their position during filming so that the general public could easily identify their favourite stars.
A common process of producing prints at the time was to tone them using selenium or palladium to produce a rich full-toned images. The use of these chemicals was often dangerous and carcinogenic.
A Modern Equivalent
So now the history lesson is out of the way, we can see that these images were not the result of 20 billion pixel cameras, 2 zillion watt electronic lightning marvels or the world's biggest soft box! If we try to keep the set-up simple, say a maximum of two or three lights, no soft boxes and one set of barn doors we don't need any special equipment to achieve the same result. Yes the cameras have come on a bit since Hurrell's day, and images will generally be much sharper than he was able to produce, however, with a few Photoshop routines we can replicate the look and tone of an image without too much heartache
Below is described a particular technique used in my studio for our current Hollywood Headshot Programme. The simplest set-up consists of a medium-powered Interfit flash unit (quite old now), fitted with a honeycomb unit to provide a highly directional, key light. A second Fresnel light consisting of a Lowell ID tungsten light, fitted with barn doors to control directionality, is also used. The difference between a honeycomb and a Fresnel is the way in which the light falls off the subject. A Fresnel is 'hotter' in the centre and can be focused, with the light getting softer at the edges, but a honeycomb provides a harder edge to the light. We can compensate for this in post production in Photoshop, but wait for it! The flash is never turned on!
The flash unit is fitted with a variable-power modelling lamp which provides a diffuse, more directional light (similar but not the same as the old movie lights of the day). Whilst the colour temperature between the light sources may differ, remember the image will be converted to a black and white, so the 'colour balance' will not be an issue, and what you see is what you get.
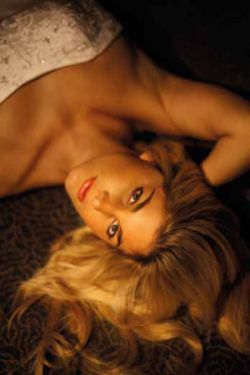
In the example shown here, the lights are positioned higher than for our normal portrait sittings and the head is raised to meet the light.
This removes the, otherwise unwanted, bags under the eyes. Our viewpoint is below eye level with the sitter looking away, creating a sense of sophisticated aloofness. The camera has been set with an f2.8 aperture and the lights adjusted accordingly.
The problem with modern digital cameras is that they can overcompensate for your lights so it's important to test your set-up before launching headlong into a full-blown shoot. Try to pre-visualise your finished print before you take it, this is how the old masters used to do it. It's not uncommon for today's photographers to 'machine gun' their clients and produce hundreds of images, Hurrell on the other hand would take his time and maybe take half a dozen, if he was feeling reckless
There are 0 days to get ready for The Society of Photographers Convention and Trade Show at The Novotel London West, Hammersmith ...
which starts on Wednesday 14th January 2026
Society of International Fashion and Glamour Photographers (SIFGP) is a trading name of BPPA Ltd
Clwyd Chambers, Clwyd Street, Rhyl, Denbighshire, LL18 3LA
BPPA Ltd Company Reg 0392 2894
VAT number 790 4289 05
Tel: +44 1745 356935


Home Page - Find a Photographer - Benefits of Membership - Professional Imagemaker Magazine - Photo Comps - Partner Societies - FREE information pack - Privacy - London Photography & Video Show Europe's Largest 'All-Welcome' Photographic Convention