
articles/Software/fxhome-page2
FXHome Photokey Pro 6 - part 2 of 1 2 3 4
by Tom Lee Published 01/08/2013

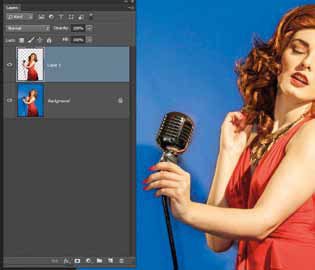
Open a Raw file in Camera Raw and make your adjustments as necessary before opening the file directly to Photoshop. Make a copy of the layer Ctrl+J (or Cmnd+J on Mac) FIG1, Select the Photokey 6 plugin from the dropdown 'Filters' menu and it opens directly into the keying software where the background is cut automatically. Using the keying controls, make your adjustment and return back into Photoshop without jumping programs FIG2 and FIG3).
Using a variation of this method, you can even assign your own mask for fine tuning directly in Photoshop, a much overdue enhancement.
Open the image as above and make a second copy layer, send it to Photokey using the plugin and then send straight back to Photoshop. We now have an original image, a chromakey layer and a second keyed layer on a transparent background. Ctrl+Click (or Cmnd+Click) on the keyed (transparent) layer thumbnail to create a selection (FIG4). Click the copied chromakey layer (layer 1) and using the icon in the layers palette (FIG5), create a layer mask from the selection. We now have full control over the mask in Photoshop.

To finish your image off, import a suitable background and make final tweaks to individual layers. Click on the top layer in your stack and press Ctrl+Shift+Alt+E to make a composite layer and do any final retouching before printing (FIG6).
Many attendees at my classes demonstrating chromakey give me great challenges, which I have always managed to fend off (cheeky buggers).
One of the most common is shooting groups of people with blue and green clothes in the same image. Using the Reflec system and Photokey Pro 6 has made this easier than ever now...
- FXHome Photokey Pro 6 page 1
- FXHome Photokey Pro 6 page 2
- FXHome Photokey Pro 6 page 3
- FXHome Photokey Pro 6 page 4
1st Published 01/08/2013
last update 20/07/2022 13:53:42
There are 0 days to get ready for The Society of Photographers Convention and Trade Show at The Novotel London West, Hammersmith ...
which starts on Wednesday 14th January 2026


