
ref 4

articles/Fashion/modelbehaviour-page4
Published 01/06/2009
By Kevin Casha
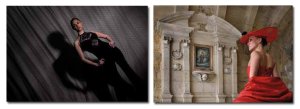
Posing
A photograph of a person freezes a fraction of a second of their life. It shows only an instant of reality, but fixes it forever in great detail. This is why correct posing is so vital to a great picture. Whenever you pose a person, a clear idea in mind is necessary. A photographer must be able to quickly and expertly lead a model through her poses and should find little difficulty in switching from one position to another. They must know how a model should properly sit down, how to angle her head and neck, where to position her arms and legs - what looks good and what does not.
The reality remains that a photographer will be mostly working with inexperienced models who are not so confident with their posing. What is essential to good posing is for the model to look and feel relaxed, as well as natural. If a pose looks awkward or uncomfortable, don't shoot it. Change it around until it feels just right. The model must always be treated with the utmost respect and embarrassing poses need to be strictly avoided.
Do not place the model square to the camera but always get her to advance one foot or the other. Take care not to leave fists or toes clenched - this is often neglected and it makes your model look nervous. Place hands on hips in such a way that annoying gaps of light do not show through the fingers. As a rule, tilting the head to one side looks much better than keeping it square and rigid. Turning the body at an angle to the camera while the face looks directly into the lens tends to slim the body - but beware, as it can lead to other problems. Avoid unnatural twisting of the head which will probably cause unsightly creases round the neck. Turning the body further towards the camera usually eliminates this problem.
The model must take care not to hunch her shoulders, which would give the back a sloppy curve and also shorten her neck. A slouched back makes the subject look tired and accentuates the bulge of the stomach. Straightening up solves all this. Hands are another headache. Keeping them occupied helps, eg holding a sweater, a bag or any suitable prop. Do not thrust hands out towards the camera, as lens distortion will make them look too big. Keeping hands together to the edges of your frame is a good option. It can also look attractive to put the hands
up to the face, but do not obscure the jaw line or rest the hands heavily as this will most likely distort the face. Sideon to the camera, the hands are much less overpowering allowing the attention to go to the face. Another answer is to flick hands casually through the hair to give a feeling of movement. Never point the model's elbows towards the camera - spreading them outwards puts the arms in better relation and proportion to the body.
Hands-on-hips often improves a picture but be careful that your model doesn't look like she is suffering from backache!
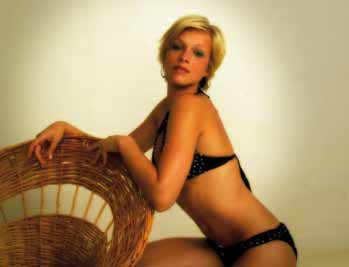
Seating your model on the floor carries its own problems. Like the hands, thrusting the legs out towards the camera is wrong. By simply bending knees away to the side, the model gets her feet in proportion and her body will look more graceful. Also, even the shapeliest legs look better if they are kept together.
Experiment with your camera angle and viewpoint - go low or high to create a different image from the one everybody else shoots. Remember you can turn your camera 360 degrees!
Presentation
Photo sessions are mainly intended to promote models and photographers who, through their portfolio, obtain assignments from clients. Your portfolio is the key to getting attractive jobs and assignments - the effort you put into this will mirror your success or failure.
A successful portfolio has to be as varied as much as possible - this will show the person's versatility and ability to fit into different roles. Mount photos in a neat, professional manner, in an album or portfolio designed specifically for the purpose. Apart from being convenient and keeping the best shots tidy, it will show seriousness and efficiency - requisites which a prospective client will be looking for.
A4 size portfolios are considered best for this purpose. It is wise to use portfolios or albums with good quality slip-in transparent pages so images can be constantly changed and updated as is necessary. Remember, it is essential to keep your portfolio up to date. Digital Enhancement, Editing and Retouching I cannot stress enough the importance of digital enhancement to a photographer's work. Tastefully editing ALL the images which go
out of your studio (be they prints or digital files) will bear dividends. People will want and buy what they see. If you want to sell a monochrome or sepia-toned image, show your client how this will look.
Keep in mind that everyone sees themselves better than they actually look - all your clients will enjoy looking better. No one buys pictures in which they look worse than they actually are! Remove any spots, blemishes or stray hair. Fine-tune figures with subtle editing. Crop creatively - do not be tied down with standard formats.
The trick of good editing is to use it as much as possible WITHOUT being obvious. It is important not to retouch pictures to the extent that the client cannot identify themselves with the image!
There are 0 days to get ready for The Society of Photographers Convention and Trade Show at The Novotel London West, Hammersmith ...
which starts on Wednesday 14th January 2026
Society of International Fashion and Glamour Photographers (SIFGP) is a trading name of BPPA Ltd
Clwyd Chambers, Clwyd Street, Rhyl, Denbighshire, LL18 3LA
BPPA Ltd Company Reg 0392 2894
VAT number 790 4289 05
Tel: +44 1745 356935


Home Page - Find a Photographer - Benefits of Membership - Professional Imagemaker Magazine - Photo Comps - Partner Societies - FREE information pack - Privacy - London Photography & Video Show Europe's Largest 'All-Welcome' Photographic Convention