
articles/Glamour/creatingreflections-page1
Creating Reflections in Adobe Photoshop - part 1 of 1 2 3 4
Published 01/02/2009

by Mark Laurie
Creating a reflection can be a simple or a complicated affair. There is the quick 'n' dirty to the long and elaborate. I have had a lot of fun with each, while receiving a lot of income from the effect. It's a technique going way back in Photoshop history, pretty much since the appearance of layers.
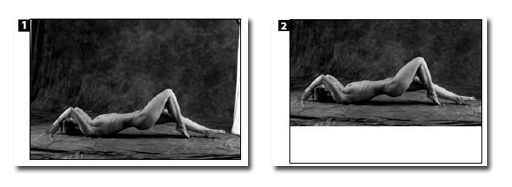
I'll start with a 'simple reflection' approach first. These steps pretty much form the foundation to any mirror effect. With your image open [Fig 1] go to Image>Canvas Size, increase the size of your image by the amount you expect the reflection to require. I often just double it, cropping the excess out later. Position the little, 'expand' icon so the canvas increases in size at the bottom of the image, hit OK.
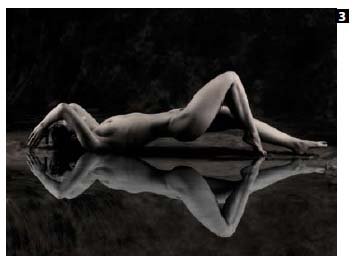
We now have [Fig 2] if your background palette was white. The colour of the background does not matter. Activate your Marquee tool in rectangular shape. Make your selection starting from one of the top corners going down to the opposite corner. Adjust the horizontal line of the marquee to where you want your reflection to start. In my image it was just at the shoulder and foot position.
You want to be precise here so enlarge your image to 75% or 100% depending on the image size. Keep to increments of 25%, Photoshop gives you a true pixel placement at those settings, it fudges it on the others (but not in CS4 - Ed.) . If your marquee selection is not quite correct, go to Select >Transform Selection. You will see your marquee take on the look of the Crop tool. Grab a corner of the marquee with your mouse and adjust the line at the reflection point until it sits right where the reflection will start. Be sure your marquee goes fully from side to side.

Hit Control/Cmd J to duplicate the selection into a new layer, then Edit>Transform>Vertical Flip. Your layer should be upside down now. Hold the Shift key down, then, with your Move tool drag the new layer down to the reflection point. This keeps the layer image from moving side to side. You have your mirror image.
But it looks rather fake. It might have passed as brilliant a few years ago, but not now. You have to tidy it up a bit. First, use the Levels or Curves in Image>Adjustments to darken it down - reflections are almost always darker in the real world. Use the Clone tool to soften the transfer edge of the mirror layer. You can also give it a slight blurring.
Let's go a little further. In [Fig 3], my mirror image has a few extra things done to it. First, as you can see from [Fig 2], there is a chunk of white. I cloned the fabric into that, covering the white. Then the reflected image was made transparent so the texture below started to come through. This gives the reflection a sense of water over a textured surface. The top image was toned slightly warm and the lower image was tinted cooler. Easy to do when layered; use a mask to blend the tones for a smooth transition.
- Creating Reflections in Adobe Photoshop page 1
- Creating Reflections in Adobe Photoshop page 2
- Creating Reflections in Adobe Photoshop page 3
- Creating Reflections in Adobe Photoshop page 4
1st Published 01/02/2009
last update 20/07/2022 13:53:41
There are 0 days to get ready for The Society of Photographers Convention and Trade Show at The Novotel London West, Hammersmith ...
which starts on Wednesday 14th January 2026


